Build Your Own Somach

Recreate a silent speech interface for under $40. Inspired by MIT's AlterEgo (Kapur et al., 2018) and Inner Speech Recognition research (Nieto et al., 2022).

₹3,196
Total Cost (~$38)
3
Guides
~4h
Build Time

Somach Hardware Guide

Complete hardware assembly. Every wire explained.
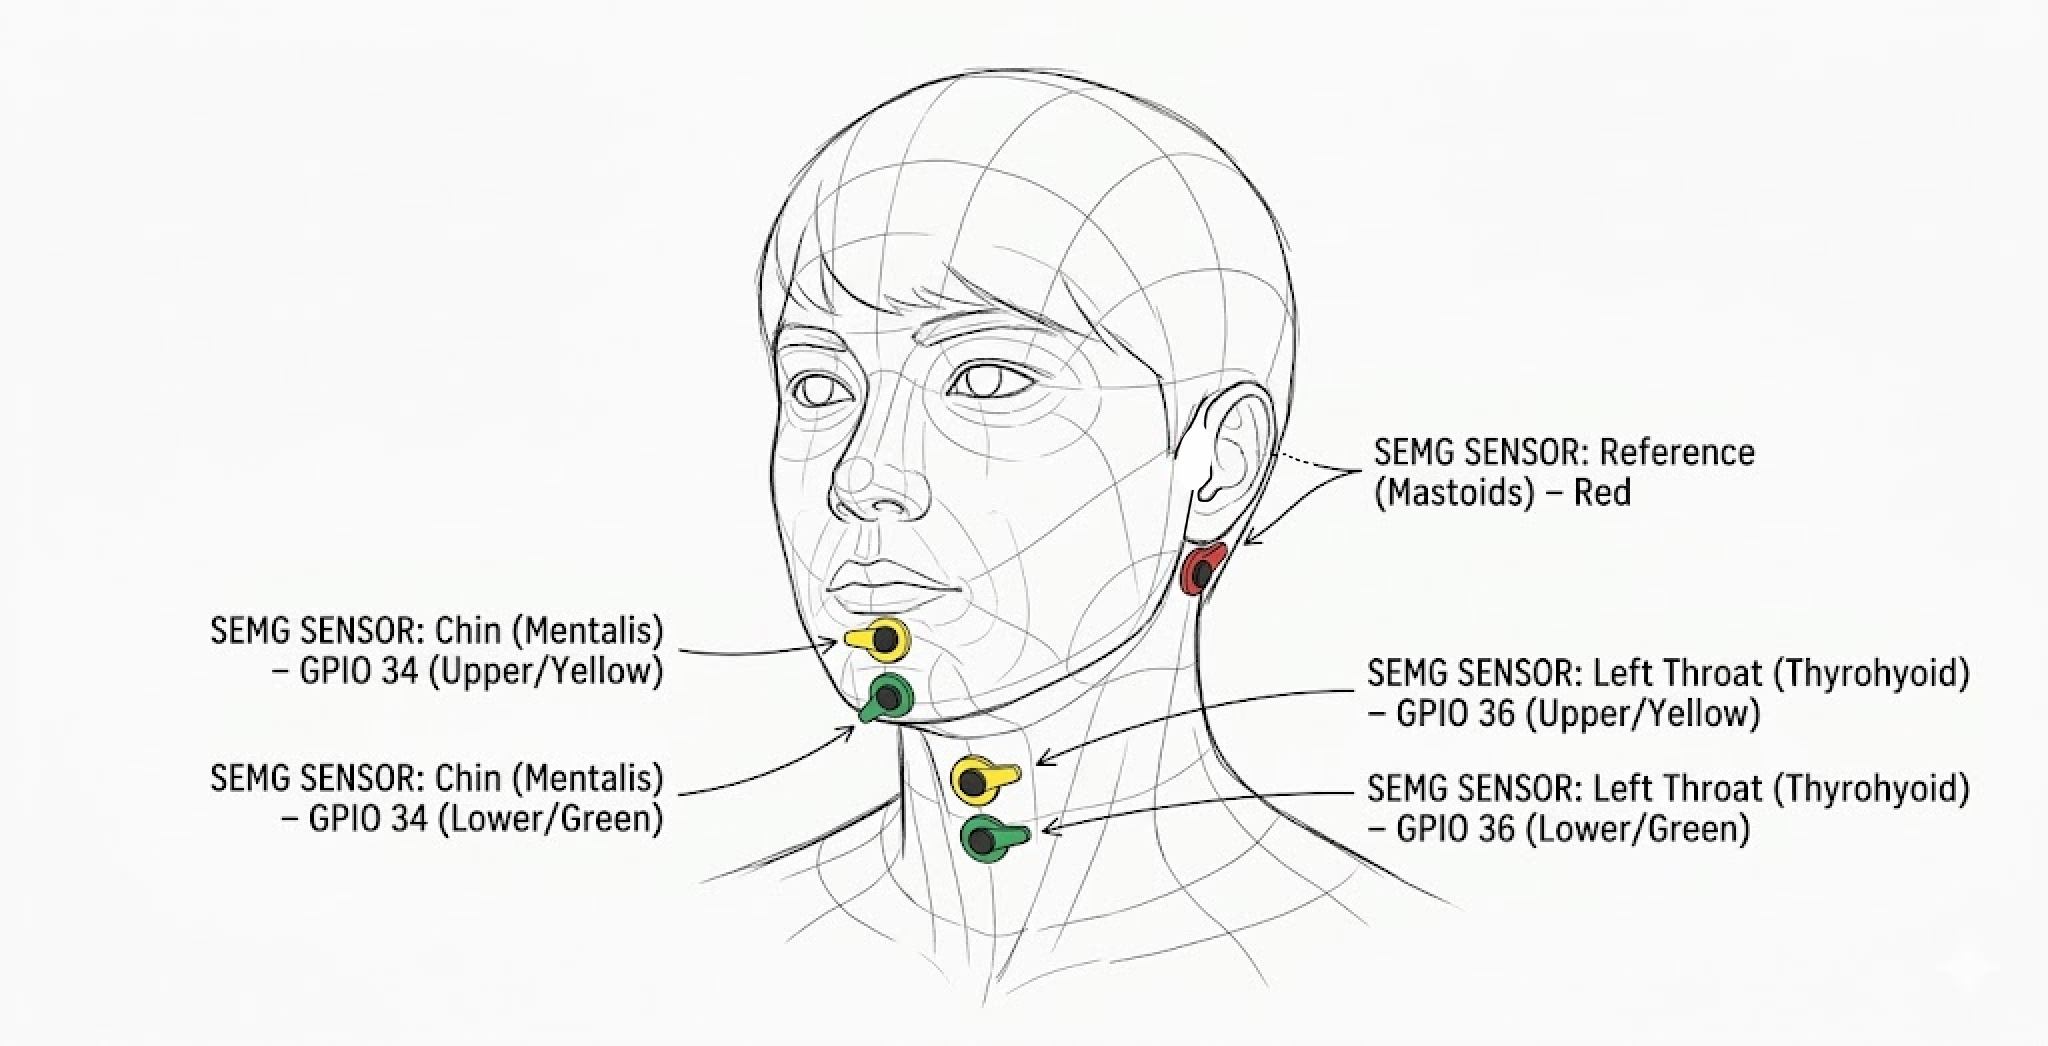
Components Required

Prices from Amazon.in (March 2026). Total: ₹3,196 (~$38)

0
Understanding Your Breadboards

Your breadboards have specific layouts. Let's confirm the orientation.

Short Breadboard (for ESP32)

Looking down at it with rows numbered on the left:

Columns: + - A B C D E F G H I J + - ┌───────────────────────────────────┐ 1 │ ● ● ○ ○ ○ ○ ○ ○ ○ ○ ○ ○ ● ● │ 2 │ ● ● ○ ○ ○ ○ ○ ○ ○ ○ ○ ○ ● ● │ 3 │ ● ● ○ ○ ○ ○ ○ ○ ○ ○ ○ ○ ● ● │ │ ...continues... │ 30 │ ● ● ○ ○ ○ ○ ○ ○ ○ ○ ○ ○ ● ● │ └───────────────────────────────────┘ ● = power rail (+ or -) ○ = main holes

Long Breadboard (for AD8232s)

Note: Your long board has reversed columns (J to A, not A to J).

Columns: + - J I H G F E D C B A + - ┌───────────────────────────────────┐ 0 │ ● ● ○ ○ ○ ○ ○ ○ ○ ○ ○ ○ ● ● │ 1 │ ● ● ○ ○ ○ ○ ○ ○ ○ ○ ○ ○ ● ● │ │ ...continues... │ 60 │ ● ● ○ ○ ○ ○ ○ ○ ○ ○ ○ ○ ● ● │ └───────────────────────────────────┘
Verify
  • Short board: columns go A → J (left to right)
  • Long board: columns go J → A (reversed)
  • Both have + and - rails on sides
1
Place ESP32 on Short Breadboard

The ESP32 straddles the center gap of the breadboard so both pin rows touch holes.

Your Placement

SHORT BREADBOARD (Top View) A B C D E F G H I J ┌───────────────────────────────────────────────┐ + │ ─ ─ ─ ─ ─ ─ ─ ─ ─ ─ ─ │ + │ │ 3 │ . [B] . . . . . . [I] . . │ ← ESP32 Start 4 │ . | . . . . . . | . . │ 5 │ . | . . . . . . | . . │ │ | ESP32 spans gap (rows 3-21) | │ │ | | │ 21 │ . [B] . . . . . . [I] . . │ ← ESP32 End │ │ - │ ─ ─ ─ ─ ─ ─ ─ ─ ─ ─ ─ │ - └───────────────────────────────────────────────┘ ↑ USB PORT (Facing You)
Side Column Rows
Left pins B 3 to 21
Right pins I 3 to 21
Verify
  • USB port faces you (toward bottom edge)
  • ESP32 straddles the center gap
  • Left pins in column B, right pins in column I
  • Spans rows 3 through 21
2
Connect ESP32 to Power Rails

Connect ESP32's power pins to the breadboard rails.

Pin Locations (from NodeMCU-32S pinout)

With ESP32 at B3-B21, the left-side pins are:

Row Pin Name Function
B3 3.3V Power output
B4 EN Enable
B5 GPIO36 (SVP) ADC input
B6 GPIO39 (SVN) ADC input
B7 GPIO34 ADC input ← use for Chin
B8 GPIO35 ADC input ← use for L-Throat
B16 GND Ground (14th pin from top)

Wiring (Direct Power Method)

We will power the AD8232s directly from the ESP32. Wire from the ESP32 (Short Board) straight to the Long Breadboard power rails.

Wire From To Color
1 A3 (ESP32 3.3V) Long Board + rail Red
2 A16 (ESP32 GND) Long Board - rail Black/Blue
Tip

This "Direct Power" method skips the short breadboard rails entirely for a cleaner signal path.

How to wire:

  1. Insert red wire into A3 (column A, row 3)
  2. Other end into any hole in the + rail
  3. Insert black wire into A16 (column A, row 16)
  4. Other end into any hole in the - rail
Verify
  • Red wire connects row 3 (3.3V) to + rail
  • Black wire connects row 16 (GND) to - rail
  • Wires are firmly inserted
3
Place AD8232 Boards on Long Breadboard

Your long breadboard has reversed columns (J to A). Your purple AD8232 is already placed.

AD8232 Pin Order

Looking at the AD8232 from the left side (where labels are printed), the 6 main pins from top to bottom are:

  1. GND — Ground
  2. 3.3V — Power
  3. OUTPUT — Signal out
  4. LO- — Leads-off (Leave empty)
  5. LO+ — Leads-off (Leave empty)
  6. SDN — Shutdown (must connect to 3.3V!)

On the right side near the 3.5mm jack, there are 3 electrode pads: RA, LA, RL

CRITICAL: Jack vs. Pad Conflict

The 3.5mm jack and the electrode pads (RA, LA, RL) are internally connected. If you wire the pads AND plug in the jack, the signals will conflict and you'll get no response to muscle movement!

  • Option A (Recommended): Use the 3.5mm jack ONLY. Do NOT wire the RA/LA pads.
  • Option B: Wire the pads directly. Do NOT plug in the 3.5mm jack.

This guide uses Option A (jack cables). Leave RA and LA pads empty.

Purple AD8232 #1 (Chin) — Your Current Placement

Pad/Pin Position Notes
RA pad C5 Right Arm electrode
LA pad D5 Left Arm electrode
RL pad E5 Reference (your soldered pin)
GND (pin 1) H9 → connect to - rail
3.3V (pin 2) H10 → connect to + rail
OUTPUT (pin 3) H11 → connect to ESP32 GPIO34
LO- (pin 4) H12 → connect to + rail (3.3V)
LO+ (pin 5) H13 → connect to + rail (3.3V)
SDN (pin 6) H14 → connect to - rail (GND)

Red AD8232 #2 smol (Left Throat) — Your Placement

Starting at row 21 (with gap from Purple #1):

Pad/Pin Position
RA pad C21
LA pad D21
RL pad E21
GND H25
3.3V H26
OUTPUT H27 → ESP32 GPIO36
LO- H28
LO+ H29
SDN H30

Red AD8232 #3 (Right Throat) — Your Placement

Starting at row 37:

Pad/Pin Position
RA pad C37
LA pad D37
RL pad E37
GND H41
3.3V H42
OUTPUT H43 → ESP32 GPIO35
LO- H44
LO+ H45
SDN H46
Tip

All three boards use column H for their main pins. This makes wiring consistent.

Verify
  • Three AD8232 boards placed with spacing between them
  • Main pins are in column H (or similar)
  • Electrode pads (RA, LA, RL) are accessible
4
Connect AD8232 Power Pins

Every AD8232 needs: GND and 3.3V connected. SDN connects to 3.3V. Output to ESP32.

Critical
  • SDN must connect to 3.3V (+ rail) to turn ON.
  • LO- and LO+ must be EMPTY. Disconnect them.

Purple AD8232 #1 (Chin) Wiring

Wire From To Purpose
1 J9 (row 9 = GND) - rail Ground
2 J10 (row 10 = 3.3V) + rail Power
3 J12 (row 12 = LO-) LEAVE EMPTY
4 J13 (row 13 = LO+) LEAVE EMPTY
5 J14 (row 14 = SDN) → connect to + rail (3.3V) Turn ON

Red AD8232 #2 smol (Left Throat) Wiring

Wire From To
6 J25 (row 25 = GND) - rail
7 J26 (row 26 = 3.3V) + rail
8 J30 (row 30 = SDN) + rail

Red AD8232 #3 (Right Throat) Wiring

Wire From To
11 J41 (row 41 = GND) - rail
12 J42 (row 42 = 3.3V) + rail
13 J46 (row 46 = SDN) + rail
Verify
  • 9 wires total from AD8232s to rails
  • Each board: 1 wire to - rail (GND)
  • Each board: 2 wires to + rail (3.3V + SDN)
5
Connect AD8232 Outputs to ESP32

Each AD8232 OUTPUT pin connects to a specific ESP32 ADC pin.

ESP32 ADC Pin Locations

With ESP32 at B3-B21:

GPIO Row Use For
GPIO34 B7 → use A7 Chin (Purple #1)
GPIO35 B8 → use A8 Right Throat (#3)
GPIO36 B5 → use A5 Left Throat (#2)

Signal Wires

Wire From (Long Board) To (Short Board) Channel
18 H11 (Purple OUTPUT) A7 (GPIO34) Chin
19 H26 (Red #2 OUTPUT) A5 (GPIO36) Left Throat
20 H41 (Red #3 OUTPUT) A8 (GPIO35) Right Throat
Verify
  • 3 signal wires between breadboards
  • Each OUTPUT connects to a unique GPIO pin
  • Using GPIO34, GPIO35, GPIO36 specifically
6
Shared RL Referencing

What is RL? RL = Reference Leg. It cancels noise. We need to connect this to your earlobe.

Important Limitation

Since we are using 3.5mm jacks, we cannot use the breadboard's RL rail safely without noise.

Instead, we will use the Red Snap from just ONE cable as the shared reference.

The "One Snap Rule"

You have 3 cables plugged in. Each has a Red (RL) snap. Since all boards share power/ground on the breadboard, you only need to connect ONE reference to your body.

Cables: [Chin Cable] ───▶ Red Snap ───▶ CONNECT TO EAR (Shared Reference) [L-Throat Cable] ─▶ Red Snap ───▶ LEAVE DISCONNECTED (Hanging) [R-Throat Cable] ─▶ Red Snap ───▶ LEAVE DISCONNECTED (Hanging)

Instructions

  1. Pick the Red Snap from your Channel 1 (Chin) cable.
  2. Snap it onto the electrode on your **Earlobe**.
  3. Take the Red snaps from Channel 2 and 3 and tuck them away (tape them back or just let them hang).
  4. Do NOT wire anything to rows 55 or index pins E5/E21/E37. Keep the breadboard clean.
Verify
  • Only 1 Red snap connected to your ear
  • Other 2 Red snaps are unused
  • No RL wires on the breadboard itself
  • Spliced cable? You don't need it anymore! Save it as a spare.
7
Power Test

Before electrodes, verify nothing is wired wrong.

  1. Double-check all wires are firmly inserted
  2. Plug USB into ESP32
  3. Plug other end into computer
Expected
  • ESP32 LED turns on
  • AD8232 LEDs turn on (if present)
  • Nothing smokes or gets hot
If Something Goes Wrong
  • Nothing lights up: Try different USB cable
  • Hot components: UNPLUG immediately
  • Smoke: Unplug. Check + and - aren't shorted
8
Upload Code

Load the program that reads muscle signals.

Arduino Code

// N-Channel Adaptive EMG Reader // Add or remove pins to match your hardware: // const int CHANNEL_PINS[] = {34, 36}; // 2 channels // const int CHANNEL_PINS[] = {34, 36, 35}; // 3 channels const int CHANNEL_PINS[] = {34, 36}; const int NUM_CHANNELS = sizeof(CHANNEL_PINS) / sizeof(CHANNEL_PINS[0]); void setup() { Serial.begin(115200); analogReadResolution(12); analogSetAttenuation(ADC_11db); Serial.println("READY"); } void loop() { for (int i = 0; i < NUM_CHANNELS; i++) { if (i > 0) Serial.print(" "); Serial.print("CH"); Serial.print(i + 1); Serial.print(":"); Serial.print(analogRead(CHANNEL_PINS[i])); } Serial.println(); delay(100); }

Upload Steps

  1. Open Arduino IDE
  2. Tools → Board → ESP32 Dev Module
  3. Tools → Port → Select your ESP32
  4. Paste code, click Upload
Verify
  • Open Serial Monitor at 115200 baud
  • See numbers like: CH1:2048 CH2:2051 (one value per channel)
  • Numbers should be around 2000-2100
Troubleshooting
  • All 0s: SDN currently grounded? Move to 3.3V.
  • All 4095: OUTPUT wires not connected?
  • Stuck at 2048: Check if electrodes actually touching skin
9
Place Electrodes

Stick electrodes to specific spots on face and neck.

Skin Prep

  1. Wipe chin, throat, earlobe with alcohol
  2. Let dry 10 seconds

Electrode Locations

  • Chin: 1cm below the groove under lower lip, centered
  • Left throat: 1.5cm left of Adam's apple
  • Right throat: 1.5cm right of Adam's apple
  • Earlobe: Left earlobe (reference)

Cable Connections

Before Plugging In

Make sure RA and LA pads are NOT wired on the breadboard. The jack shares the same circuitry — having both connected causes signal conflicts.

  • Yellow + Green → on each muscle site (differential)
  • Red → only ONE used, connects to earlobe (shared RL)
  • Plug 3.5mm jacks into corresponding AD8232 boards
Wait 3 Minutes

Let electrodes settle before recording.

Test
  • Do a BIG SWALLOW → Throat channels spike
  • CLENCH JAW → CH1 spikes
  • If you see spikes, the system works
10
Quick Reference

Short Breadboard (ESP32)

ESP32 Pin Row Connects To
3.3V 3 + rail
GND 16 - rail
GPIO34 7 Purple OUTPUT (Chin)
GPIO35 8 Red #3 OUTPUT (R-Throat)
GPIO36 5 Red #2 OUTPUT (L-Throat)

Each AD8232 Board

Pin Connects To
GND - rail
3.3V + rail
OUTPUT ESP32 GPIO pin
LO- EMPTY
LO+ EMPTY
SDN + rail (3.3V)
RL pad Junction → earlobe

Total Wire Count: 22

  • 2 power wires (ESP32 direct to Long Board)
  • 9 AD8232 power wires (3 per board)
  • 3 signal wires (OUTPUT to GPIO)
  • 3 RL junction wires + 1 to electrode

Software Setup Guide

From zero to reading muscle signals. Step by step.

What You Need

  • Completed Hardware — from the Hardware Build Guide
  • Computer — Mac, Windows, or Linux
  • USB Cable — to connect ESP32
  • Internet — for downloads
  • ~30 minutes — for full setup
0
Prerequisites & Overview

Before we start, let's understand what we're doing and make sure you're ready.

How The System Works

Your Body Hardware Computer ───────── ───────── ───────── Muscles ──▶ AD8232 Sensors ──▶ ESP32 ──▶ USB ──▶ Arduino IDE (EMG) (amplify) (read) (view data) │ ▼ Python (analyze)
Important
  • You MUST upload Arduino code BEFORE Python can read anything
  • Arduino code = the "engine" that generates data
  • Python = the "dashboard" that reads what Arduino sends
Checkpoint
  • Hardware build is complete (all wires connected)
  • ESP32 is plugged into your computer via USB
  • You see some LED light up on the ESP32
1
Install Arduino IDE

Arduino IDE is the program you use to write and upload code to your ESP32.

Download

  1. Go to: arduino.cc/en/software
  2. Click "Download" for your operating system
  3. Install it like any other app

For Mac Users

  1. Download the .dmg file
  2. Drag Arduino to Applications
  3. First time: Right-click > Open (to bypass Gatekeeper)

For Windows Users

  1. Download the .exe installer
  2. Run the installer
  3. Check "Install USB driver" when prompted
Version

This guide uses Arduino IDE 2.x. The interface looks modern and dark. If yours looks old/gray, you may have version 1.x — it still works, but menus are in different places.

Verify
  • Arduino IDE opens without errors
  • You see a blank sketch with setup() and loop()
2
Install ESP32 Board Package

Arduino doesn't know about ESP32 by default. We need to add it.

Add ESP32 Board URL

  1. Open Arduino IDE
  2. Mac: Arduino IDE > Settings (or ⌘ + ,)
  3. Windows: File > Preferences
  4. Find "Additional boards manager URLs"
  5. Paste this URL:
https://raw.githubusercontent.com/espressif/arduino-esp32/gh-pages/package_esp32_index.json
  1. Click OK

Install ESP32 Board

  1. Go to Tools > Board > Boards Manager
  2. Search for "esp32"
  3. Find "ESP32 by Espressif Systems"
  4. Click Install (this takes 2-5 minutes)
Common Issue
  • If install fails, check your internet connection
  • Try closing and reopening Arduino IDE
  • On Mac, you may need to allow network access

Select Your Board

  1. Go to Tools > Board > ESP32 Arduino
  2. Select "ESP32 Dev Module"
Verify
  • Tools > Board shows "ESP32 Dev Module"
  • No error messages in the bottom panel
3
Upload EMG Reading Code

Now we upload the code that makes your ESP32 read the AD8232 sensors.

Select Your Port

  1. Plug in your ESP32 via USB
  2. Go to Tools > Port
  3. Select the port that appears (usually has "USB" or "UART" in the name)
Finding Your Port

Mac: Look for /dev/cu.usbserial-XXXX or /dev/cu.SLAB_USBtoUART

Windows: Look for COM3, COM4, etc.

Linux: Look for /dev/ttyUSB0

The Code

Delete everything in the editor and paste this:

// 3-high-speed-capture.ino
// N-Channel Adaptive EMG Capture (250Hz+)
// Add or remove pins to match your hardware.

// ==========================================
// CHANNEL CONFIGURATION
// ==========================================
const int CHANNEL_PINS[] = {34, 36};  // GPIO pins for each AD8232
// Examples:
//   1 channel (chin only):       {34}
//   2 channels (chin + throat):  {34, 36}
//   3 channels (chin + L + R):   {34, 36, 35}
const int NUM_CHANNELS = sizeof(CHANNEL_PINS) / sizeof(CHANNEL_PINS[0]);

const unsigned long SAMPLE_INTERVAL_MICROS = 4000; // 250 Hz

unsigned long lastSampleTime = 0;

void setup() {
    Serial.begin(115200);
    for (int i = 0; i < NUM_CHANNELS; i++) {
        pinMode(CHANNEL_PINS[i], INPUT);
    }
    analogReadResolution(12);
    analogSetAttenuation(ADC_11db);
    Serial.println("READY");
}

void loop() {
    unsigned long currentMicros = micros();
    if (currentMicros - lastSampleTime >= SAMPLE_INTERVAL_MICROS) {
        lastSampleTime = currentMicros;

        // CSV Format: Timestamp, Ch1, Ch2, ..., ChN
        Serial.print(millis());
        for (int i = 0; i < NUM_CHANNELS; i++) {
            Serial.print(",");
            Serial.print(analogRead(CHANNEL_PINS[i]));
        }
        Serial.println();
    }
}

Upload

  1. Click the → Upload button (top left arrow)
  2. Wait for "Compiling..." then "Uploading..."
  3. You'll see progress percentages
  4. Done when you see "Done uploading"
Upload Failed?
  • Wrong port selected — check Tools > Port
  • Driver issue — on Windows, install CP210x driver
  • Try holding BOOT button while uploading
  • Try a different USB cable (some are charge-only)
Verify
  • Console shows "Done uploading"
  • No red error messages
4
Serial Monitor Test

Now let's see if your ESP32 is actually sending data.

Open Serial Monitor

  1. In Arduino IDE, click the magnifying glass icon (top right)
  2. Or go to Tools > Serial Monitor
  3. Set baud rate to 115200 (dropdown at bottom)

What You Should See

READY 12340,2048,2051,2045 12344,2049,2050,2046 12348,2047,2052,2044 12352,2048,2050,2045 ...

Understanding the Numbers

Value Meaning
~2048 Normal baseline (middle of 0-4095 range) ✅
0 or very low Sensor not working — check SDN wire ❌
4095 (max) Saturated — check OUTPUT wire ❌
~2048 but no response Jack + pads wired? Unplug jack OR remove pad wires ⚠️
Jumping wildly Noisy — check LO+/LO- wires ⚠️
No Electrodes Yet!

At this stage, you're testing without electrodes attached. The ~2048 reading proves the sensors are powered and the ESP32 is reading them correctly. Electrode testing comes later.

Verify
  • See "READY" message
  • All channels show values around 1900-2200
  • Numbers update every ~0.1 seconds
5
Install Python

Python lets us analyze the EMG data more powerfully than the Serial Monitor.

Check if Python is Installed

Open Terminal (Mac/Linux) or Command Prompt (Windows) and type:

python3 --version

If you see Python 3.x.x, you're good. If not, install it:

Install Python

  1. Go to: python.org/downloads
  2. Download the latest Python 3.x
  3. Windows: Check "Add Python to PATH" during install!
  4. Install

Install Required Packages

In Terminal/Command Prompt, run:

pip3 install pyserial numpy
What These Do
  • pyserial — lets Python talk to USB devices
  • numpy — for math/statistics on your data
Verify
  • python3 --version shows Python 3.x
  • pip3 install pyserial numpy completes without errors
6
Hardware Validation Script

This Python script checks if all your channels are working correctly — without electrodes.

Important
  • CLOSE the Arduino Serial Monitor first!
  • Only one program can use the USB port at a time
  • If Python says "port busy", close Serial Monitor

Create the Script

  1. Create a new file called validation_test.py
  2. Paste the code below
  3. Change the port to match yours (from Arduino IDE Tools > Port)
# validation_test.py # Run this WITHOUT electrodes to test hardware import serial import time import numpy as np # ⚠️ CHANGE THIS to your port! PORT = '/dev/cu.usbserial-0001' BAUD_RATE = 115200 try: ser = serial.Serial(PORT, BAUD_RATE, timeout=1) time.sleep(2) # Wait for ESP32 except Exception as e: print(f"Error: {e}") exit() print("=" * 50) print("HARDWARE VALIDATION - NO ELECTRODES") print("=" * 50) # Collect 30 samples samples = [] print("Listening...", end="", flush=True) start_t = time.time() while len(samples) < 30 and (time.time() - start_t) < 5.0: line = ser.readline().decode('utf-8', errors='ignore').strip() if line: parts = line.split(',') # Parse all channels dynamically if len(parts) >= 2: try: values = [int(p) for p in parts[1:]] samples.append(values) if len(samples) % 5 == 0: print(".", end="", flush=True) except ValueError: pass print("\n") if not samples: print("❌ NO DATA. Check connection.") ser.close() exit() # Analyze samples = np.array(samples) for i, name in enumerate(['CH1 (Chin)', 'CH2 (L-Throat)', 'CH3 (R-Throat)']): mean = np.mean(samples[:, i]) std = np.std(samples[:, i]) print(f"\n{name}:") print(f" Mean: {mean:.1f} (expect ~2048)") print(f" Std: {std:.1f} (expect < 50)") if mean < 100: print(" ❌ DEAD") elif mean > 4000: print(" ⚠️ SATURATED") elif std > 100: print(" ⚠️ NOISY") elif 1900 < mean < 2200 and std < 50: print(" ✅ GOOD") ser.close()

Run It

  1. CLOSE Arduino Serial Monitor
  2. Open Terminal/Command Prompt
  3. Navigate to where you saved the file
  4. Run: python3 validation_test.py

Expected Output

================================================== HARDWARE VALIDATION - NO ELECTRODES ================================================== CH1:2048 CH2:2051 CH1:2049 CH2:2050 ... CH1 (Chin): Mean: 2048.3 (expect ~2048) Std: 12.1 (expect < 50) ✅ GOOD CH2 (Throat): Mean: 2050.1 (expect ~2048) Std: 15.3 (expect < 50) ✅ GOOD
Verify
  • All channels show ✅ GOOD
  • If any show ❌ or ⚠️, check the wiring for that sensor
7
Electrode Contact Test

Now we test with electrodes on your body to verify muscle signals are detected.

1. Skin Preparation (Crucial!)

Poor skin contact = noise. Do not skip this.

  • Wipe: Vigorously wipe chin, throat, and earlobe with an alcohol pad.
  • Dry: Wait 10 seconds for it to dry completely.
  • Placement: Stick electrodes before connecting cables.

2. Electrode Placement Strategy

We target the speech-relevant musculature identified in the AlterEgo paper (Kapur et al., 2018). Precision here determines signal quality.

sEMG electrode placement diagram showing chin (Mentalis, GPIO 34), left throat (Thyrohyoid, GPIO 36), and mastoid reference positions
Fig. 1 — sEMG electrode positions. Chin (Mentalis) → GPIO 34. Left Throat (Thyrohyoid) → GPIO 36. Mastoid → shared reference (RL). From Kho (2025), Paper 1.
Why Precision Matters

The AlterEgo paper ranked 7 locations. Our channels target the Top ranked regions. Placing electrodes 1cm off-target can drop accuracy by 10-15%.

1. Channel 1: Mental Region (Chin)

Primary Signal. Captures Mentalis and Digastric muscles.

Electrode Placement Anatomical Cue
🟡 Yellow (+) Mentolabial Sulcus
Center of chin, groove below lip
Feel muscle active when pouting lip
🟢 Green (-) Mylohyoid
Underside of chin, 1.5cm below Yellow
Bony underside, active when opening jaw
🔴 Red (Ref) Left Earlobe SHARED REFERENCE for all channels
SENSORY CHECK: The "Golf Ball" Test
  1. Action: Pout your bottom lip out (like a sad face).
  2. Feel: Touch the Yellow electrode. You should feel a hard, marble-sized lump bunch up under the sticker.
  3. Verify: If it feels flat or soft, move the electrode UP until you feel that hard lump.

2. Channel 2: Left Laryngeal (Throat) (Kapur Table 1, Rank #2)

Swallow—feel your Adam's apple move UP? That's the laryngeal region. Place electrodes on the LEFT side.

🟡 Yellow (+) Left Thyroid Lamina
1.5cm LEFT of Adam's Apple
Feel the flat cartilage "wing"
🟢 Green (-) Strap Muscles
1.5cm below Yellow
Vertical muscle band
🔴 Red DISCONNECTED Use Ch1 Red only
SENSORY CHECK: The "Elevator" Test
  1. Action: Place finger lightly on Yellow electrode. Swallow hard.
  2. Feel: The hard Adam's apple cartilage slides UP underneath your finger (like an elevator).
  3. Verify: If you only feel soft skin moving, you are too far out. Move CLOSER to center until you feel the hard cartilage slide under.

3. Channel 3: Right Laryngeal (Throat) (Kapur Table 1, Rank #3)

Mirror of Channel 2. Right side of Adam's apple.

🟡 Yellow (+) Right Thyroid Lamina
1.5cm RIGHT of Adam's Apple
Mirror of Ch2
🟢 Green (-) Strap Muscles
1.5cm below Yellow
Mirror of Ch2
🔴 Red DISCONNECTED Use Ch1 Red only
SENSORY CHECK: Mirror the Left
  1. Action: Perform the "Elevator Test" on the right side.
  2. Goal: Symmetry. Both sides should feel the hard cartilage sliding up equally.
Wait 3 Minutes!

After applying electrodes, wait 3 minutes before recording. The electrolyte gel needs time to settle into the skin to lower impedance.

3. Cable Connections

CRITICAL: Jack vs. Breadboard

Do NOT wire the RA/LA pads on the breadboard.
The 3.5mm jack shares the same internal circuitry. Having wires on the pads while the jack is plugged in causes signal conflict.

  • Yellow + Green: Snap onto the muscle site (e.g., Chin). Polarity doesn't matter for differential EMG.
  • Red (RL): Connect ONE red snap to your Earlobe. Leave the other two red snaps hanging (disconnected).

Create the Test Script

Save this as electrode_test.py:

# electrode_test.py # Run WITH electrodes attached import serial import numpy as np import time # ⚠️ CHANGE THIS to your port! PORT = '/dev/cu.usbserial-0001' ser = serial.Serial(PORT, 115200) time.sleep(2) def collect_samples(duration=3): samples = [] start = time.time() while time.time() - start < duration: line = ser.readline().decode('utf-8', errors='ignore').strip() if 'CH1:' in line: parts = line.split() values = [int(p.split(':')[1]) for p in parts] samples.append(values) return np.array(samples) print("ELECTRODE CONTACT TEST") print("=" * 40) # Test 1: Baseline print("\n[TEST 1] BASELINE - Sit still") input("Press Enter when ready...") baseline = collect_samples(3) for i in range(baseline.shape[1]): print(f"CH{i+1} range: {np.ptp(baseline[:,i]):.0f}") print("(Good if all < 80)") # Test 2: Swallow print("\n[TEST 2] SWALLOW - Do a big swallow") input("Press Enter, then SWALLOW...") swallow = collect_samples(3) for i in range(1, swallow.shape[1]): print(f"CH{i+1} spike: {np.ptp(swallow[:,i]):.0f} (expect > 200)") # Test 3: Jaw clench print("\n[TEST 3] JAW CLENCH - Clench your jaw hard") input("Press Enter, then CLENCH...") clench = collect_samples(3) print(f"CH1 spike: {np.ptp(clench[:,0]):.0f} (expect > 300)") # Results print("\n" + "=" * 40) if (np.ptp(baseline[:,0]) < 80 and np.ptp(swallow[:,1]) > 200 and np.ptp(clench[:,0]) > 300): print("✅ ALL TESTS PASSED - Ready for data collection!") else: print("⚠️ Some tests may need adjustment") print("Check electrode placement and try again") ser.close()

Run It

python3 electrode_test.py

What the Tests Check

Test Action Expected Result
Baseline Sit completely still All channels stable (range < 80)
Swallow Big swallow Throat channels spike (> 200)
Jaw Clench Clench jaw hard CH1 spikes (> 300)
Verify
  • Baseline is stable
  • Swallow causes throat channels to spike
  • Jaw clench causes chin channel to spike
  • Script shows "✅ ALL TESTS PASSED"
8
Data Collection

Now that your hardware is verified, it's time to build your dataset. We need to record examples of you "speaking" specific words silently.

Usage

  1. This step is simpler now!
  2. Go to the ML Walkthrough (Tab 4).
  3. We will use the advanced 4-curriculum-recorder.py there.
  4. It handles everything: labels, phases, and saving.
Checkpoint
  • Hardware is verified.
  • Firmware is the correct High-Speed version.
  • Proceed to Tab 4 for the real fun!
9
What's Next

Congratulations! Your AlterEgo hardware and software are working. Here's what comes next:

Immediate Next Steps

  1. Data Collection: Record samples of you "silently speaking" different words
  2. Feature Extraction: Convert raw signals to MFCC features
  3. Model Training: Teach AI to recognize your words
  4. Real-time Inference: Use the trained model to decode silent speech

Expected Performance

Metric Target
Vocabulary 10 words (digits 0-9)
Accuracy 75-85% (scales with channels)
Training Data ~75 samples per word
Latency < 0.5 seconds

Resources

  • Hardware Guide: alterego-step.html
  • Original Paper: Kapur et al., "AlterEgo" (2018)
  • ESP32 Docs: espressif.com/esp32
Pro Tips
  • Practice "closed-mouth exaggerated" speech — lips sealed, muscles tensed
  • Collect data in multiple sessions for robustness
  • Start with a small vocabulary (5 words) before expanding
  • Keep electrode placement consistent between sessions
You've Completed
  • Hardware assembly (from Hardware Guide)
  • Software installation
  • Hardware validation
  • Electrode testing
  • You're ready for data collection!

ML Introduction: The Concepts

Understand the theory before you dive in.

📖 This is Theory Only

This guide explains what we're doing and why. It doesn't include hands-on exercises.

Ready to start training?Go to the ML Walkthrough (Hands-On Lab) →

0
The Strategy

We are not reading thoughts. We are reading the body's shadow of thoughts.

The "Silent" Problem

When you speak silently, the muscle signals are tiny. Barely visible above the noise.

LOUD SPEAKING
100 μV
WHISPERING
50 μV
SILENT (THINKING)
5 μV
↑ Barely visible!

The Solution: Curriculum Learning

We don't jump straight to silent speech. We train in steps:

1
"FIVE" (Lips)
Mouthing - Strongest silent signal
2
"FIVE" (Silent)
Subvocal - Harder
3
"FIVE" (Mental)
Intention - Hardest
1
Data Collection

Machine learning needs examples. Hundreds of them.

We use the ESP32 to capture muscle voltage at 250 times per second. This creates a time-series CSV file for every word you speak.

Why 250Hz?

Human speech muscles move fast. If we measure too slowly, we miss the subtle twitches that distinguish "P" from "B".

2
Signal Cleaning

Raw signals are full of static (from lights, wifi, movement). We need to filter them.

RAW (Noisy) CLEAN (Smooth)
∿∿╱╲╱∿∿
Filter
╱╲
3
Feature Extraction (MFCC)

This is the magic step. Neural networks don't understand "waves". They understand patterns.

Sound to Image

We convert the audio wave into a heatmap (Spectrogram). This lets the AI "see" the word like a picture.

WAVE
Time →
"Heatmap"

The AI looks at this heatmap and says: "Oh, a bright spot in the bottom-left corner? That usually means 'ONE'."

4
Training

We show the AI thousands of these heatmaps, labeled "ONE", "TWO", etc.

How it Learns

It starts by guessing randomly. If it guesses "TWO" when the label is "ONE", we tell it to adjust its internal math slightly. Over thousands of repetitions (Epochs), it gets accurate.

INPUT
(Heatmap)
NEURAL NET
(Pattern Matcher)
OUTPUT
("ONE")
5
Transfer Learning

Why do we record "Overt" (loud) speech if we want "Silent" speech?

Because loudness doesn't change the shape of the word much. We train the heavy lifting on the loud (easy) data, then fine-tune it on the silent (hard) data.

Analogy

It's like learning to drive a truck. Once you know how to drive a truck (Loud), learning to drive a car (Silent) is easy. You transfer the knowledge.

6
Confusion Matrix

How do we know if the model is good? We use a Confusion Matrix.

Pred: APred: B
Actual: ACorrectError
Actual: BErrorCorrect

It tells you exactly what mistakes are happening. If the model thinks "FIVE" is "NINE", you know you need to pronounce those two more distinctly.

ML Walkthrough: Hands-On Lab

Let's train a model to recognize your silent speech. We start small, then grow.

The "Start Small" Philosophy

Machine learning is overwhelming if you try to do everything at once. We will use a Curriculum Learning approach:

Phase 1: Just one word ("ONE"). Validation.
Phase 2: Three words ("ONE", "TWO", "THREE"). Classification.
Phase 3: All digits (0-9). Scaling up.

We focus on Mouthing (silent lip movement) first. It provides the best balance of signal strength and silence.

0
Preflight Check

Ensure your system is ready.

Requirements

What Status
Hardware Built & Connected via USB
Arduino IDE Installed & Opens
Python 3 Installed (python3 --version)
Checkpoint
  • ESP32 is connected via USB
  • You know your Serial Port (e.g. COM3 or /dev/cu.SLAB...)
1
Verify Firmware
STOP: Perform Sensory Check First!
  1. Action: Perform "Golf Ball" and "Elevator" tests (Hardware Step 7).
  2. Why: 1cm off = Garbage Data. You cannot fix bad placement with code.

Ensure you have the valid High-Speed CSV Firmware running (from Software Step 3).

Verify

Open Serial Monitor (115200 baud). You should see numbers formatted like this:

12340,2048,2051,2045...
2
Start the Recorder

Run the Python script. It will ask you for session details.

cd code/python
python3 4-curriculum-recorder.py

Session Setup

  1. Subject ID: Enter your name (e.g., carl).
  2. Phase: Select 3 (Mouthing). This is the best starting point.
  3. Labels: Enter: ONE, TWO, THREE, SILENCE (comma-separated).
  4. Samples: Enter 20 (20 reps per word — research minimum).

What You'll See

╔════════════════════════════════════════════════════════╗
║ OpenEMG // DATA ACQUISITION ║
╚════════════════════════════════════════════════════════╝
SESSION: Phase_3_Mouthing
TARGET: 80 SAMPLES (20/LABEL)
──────────────────────────────────────────────────────
[001/080] TARGET: ONE | [CH1: 2048] [CH2: 1950]
[HOLD SPACE] RECORD [ESC] QUIT

The live values update in real-time. Watch them jump when you flex! Channel count adapts to your hardware.

3
Record Data

The recorder is now in "Session Mode". Follow the on-screen prompts.

The Dashboard

TARGET: ONE | [CH1: 2048] [CH2: 1950] ... (auto-detected channels)

Watch the TARGET word. That's what you need to say.

How to Record

  1. Relax your face.
  2. Press & Hold SPACEBAR. (Recording starts instantly).
  3. Mouth the word (e.g., "ONE") immediately.
  4. Release SPACEBAR when done.
Pro Tip: "Zero Latency"

The Spacebar is a "dead man's switch". The moment you press it, we capture. The moment you release, we save. Sync your muscle movement to your finger.

4
Verify Data

Once you finish the session (or press ESC), data is saved automatically.

Check Your Files

Go to your folder: code/python/data_collection/carl/Phase_3_Mouthing/

  • You should see ~80 files (20 per word x 4 words).
  • Open one CSV. It should have columns: Timestamp, CH1, CH2, ..., CHN, Label, Phase (N = your channel count).
Checkpoint

You have a folder full of CSVs required for training.

5
Observe & Reflect

Open a CSV file for "ONE" and a CSV file for "TWO". Look at the data columns.

🤔 Can YOU tell the difference?

  • Look at the raw numbers. They probably look like chaos.
  • This is normal! Humans are bad at reading raw EMG.
  • However, check for satuation (values stuck at 4095 or 0). That means bad contact.
6
Clean Your Signal (Preprocessing)

Raw EMG signals are noisy. This step removes interference so the AI can focus on the real muscle patterns.

python3 5-preprocess.py --input data_collection/carl/Phase_3_Mouthing --output data_collection/carl/cleaned

🔧 What's Happening Under the Hood?

1. Bandpass Filter (1.3–50 Hz)

  • Low-pass (50 Hz): Removes high-frequency noise (electrical spikes, sensor artifacts).
  • High-pass (1.3 Hz): Removes "DC drift" — slow baseline wander caused by electrode movement.

2. Notch Filter (60 Hz)

  • Specifically targets powerline hum — the 60Hz buzz from your wall outlet that couples into unshielded wires.

3. Normalization

  • Scales all values to 0–1 range so different recording sessions are comparable.

This script processes all CSVs in the input folder recursively. It outputs cleaned versions with the same directory structure.

7
Extract Features (MFCC)

The AI can't read raw numbers. We need to convert the signal into a "fingerprint" it can understand.

python3 6-extract-features.py --input data_collection/carl/cleaned --output data_collection/carl/features

🎵 What Are MFCCs?

Mel-Frequency Cepstral Coefficients come from audio/speech processing. They represent "which frequencies were active at which time" — essentially a spectrogram.

  • Why this works: Each word you mouth creates a unique pattern of muscle activation frequencies. "ONE" activates different muscle fibers (frequencies) than "TWO".
  • Output: A 2D "image" (time × 13 coefficients) for each CSV. The AI will learn to recognize these images.

This also saves label_encoder.pkl — a mapping from your labels (ONE, TWO...) to numbers (0, 1...) for the model.

8
Train Your Model

Now the AI learns to recognize your muscle patterns. With 20 samples per word, you should see meaningful results.

python3 7-train-model.py --features data_collection/carl/features --epochs 50

🧠 What's Happening During Training?

We use a 1D Convolutional Neural Network (CNN). Here's the intuition:

  1. Layer 1: Learns low-level patterns — "a sudden spike" or "a slowly rising hum".
  2. Layer 2: Combines low-level patterns into higher-level features — "spike THEN hum = 'O' sound".
  3. Final Layer: Maps these combined patterns to your labels (ONE, TWO, THREE, SILENCE).

Watch the output: Epoch accuracy should climb over time. If stuck at random (~25% for 4 classes), check your electrodes!

The trained model is saved to models/. You'll use it for live prediction next.

9
🔴 Live Prediction!

This is the most satisfying part. Watch the AI recognize your mouth movements in real-time.

python3 8-realtime-predict.py --model models/emg_model.pth --encoder data_collection/carl/features/label_encoder.pkl

How It Works

  1. The script connects to your ESP32 and continuously reads EMG data.
  2. Every 2 seconds, it takes a snapshot, cleans it, extracts MFCCs, and feeds it to your trained model.
  3. The prediction is displayed live on your terminal.

Try this: Mouth "ONE", watch it predict. Mouth "TWO", watch it change. 🎉

========================================
🎤 LIVE INFERENCE - Speak into the device
Press Ctrl+C to stop
========================================
🗣 Detected: ONE | Confidence: 87.3%
Troubleshooting
  • All predictions are SILENCE: You're mumbling too softly. Exaggerate your movements.
  • Confidence always ~25%: Model is guessing. Go back and check electrode contact, re-record if needed.
  • Model not found error: Make sure Step 8 completed and saved to models/.
10
Optional: Hard Mode (Speech)

You mastered mouthing. Now try Overt Speech (speaking out loud).

This is actually easier for the computer (stronger signal) but harder for subvocal transfer later. It's a good dataset to have for comparison.

Select "Phase 2 (Overt)" in the recorder and repeat the process if you suspect your mouthing signals are too weak.

11
Confusion Matrix

Check where your model failed.

python3 9-confusion-matrix.py --model models/phase3_mouthing.pth --features data_collection/my_first_data/features

Reading the Matrix

  • Green Diagonal: Good! Correct predictions.
  • Red Squares: Bad! The model got confused.
  • Example: If "THREE" row has red in "EIGHT" column, it thinks 3 is 8.
Back to Portfolio